How to Upscale Pixel Art: A Beginner's Quick-Start Guide
Learn how to upscale pixel art without blurring. This quick-start guide covers Nearest Neighbor settings, AI tools, and exact workflows for crisp results.
Nearest neighbor upscaling is an image resizing algorithm that duplicates existing pixels to enlarge an image without blending or blurring the edges. For pixel art, it is the definitive method to increase resolution while preserving the crisp, blocky aesthetic of the original sprite. This guide is built for pixel artists, indie game developers, and retro modders who need to scale sprites for high-definition displays without introducing unwanted anti-aliasing.
- Nearest neighbor duplicates pixels without blending, preserving hard edges.
- Always disable anti-aliasing and auto-sharpening features in your software.
- Export final upscaled assets as lossless PNG files to prevent compression blur.
What Is Nearest Neighbor Upscaling?
Nearest Neighbor Interpolation: A mathematical algorithm used in digital image processing that assigns the value of the closest original pixel to newly created pixels during resizing. This method completely avoids the color blending and edge softening characteristic of bilinear or bicubic algorithms. It guarantees that no intermediate colors are generated during the transformation process.
When you enlarge a digital image, the software must invent new pixels to fill the expanded grid. Nearest neighbor simply looks at the adjacent original pixel and copies its exact color value. This creates a uniform, blocky enlargement that perfectly mirrors the original artist's intent.
Why It Is Essential for Pixel Art
Pixel art relies on deliberate pixel placement rather than smooth gradients. A standard 16x16 pixel canvas contains exactly 256 individual color nodes. If you use a blending algorithm, the software creates intermediate colors that destroy the intentional hard edges and dithering patterns.
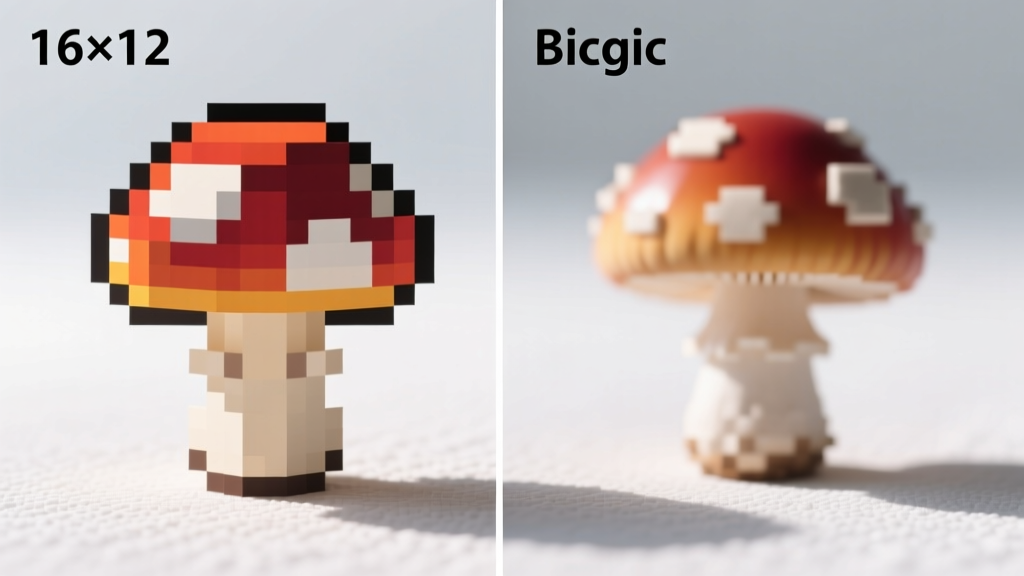
By applying an 800% scale factor using nearest neighbor, every original pixel becomes an 8x8 block of identical pixels. This maintains the 24-bit color depth integrity without introducing muddy artifacts. It is the only way to prepare retro sprites for modern displays while keeping the authentic 1983 Nintendo Famicom hardware aesthetic.
Software Configuration Guides
Different graphics editors hide their interpolation settings in various menus. Below are the exact configurations required to ensure your software defaults to the correct algorithm. Always verify these settings before executing the resize command to prevent accidental data loss.
Aseprite
Aseprite is built specifically for sprite creation and defaults to the correct behavior. Navigate to the Sprite menu and select Sprite Size to open the scaling dialog. Ensure the Interpolation dropdown is explicitly set to Nearest Neighbor before applying your new dimensions, as detailed in the Aseprite documentation on sprite resizing.
Adobe Photoshop
Adobe Photoshop requires manual intervention because it defaults to bicubic automatic for photographs. Open the Image Size dialog box and locate the Resample dropdown menu at the bottom of the panel. Select Preserve Details or Nearest Neighbor (Hard Edges) to prevent the software from smoothing your pixel art, according to the Adobe Photoshop official resizing guide.
GNU Image Manipulation Program
The GNU Image Manipulation Program (GIMP) offers a straightforward scaling interface for open-source workflows. Access the Scale Image tool from the Image menu and expand the Interpolation dropdown. Choose None to apply the nearest neighbor algorithm, which the GNU Image Manipulation Program scale image documentation confirms prevents edge blurring.
Interpolation Comparison Matrix
Choosing the wrong mathematical model will permanently alter your sprite data. Use this decision framework to select the appropriate algorithm based on your specific asset type and final output requirements. Review the matrix below before processing batch exports to ensure consistent visual quality.
| Algorithm | Best Use Case | Edge Handling | Processing Speed |
|---|---|---|---|
| Nearest Neighbor | Pixel art, 8-bit sprites, hard-edge UI | Crisp, blocky, zero blending | Fastest (0.1 seconds) |
| Bilinear | Low-resolution photographs, smooth gradients | Soft, slightly blurred edges | Moderate (0.5 seconds) |
| Bicubic | High-resolution photography, digital painting | Sharp but introduces halos | Slowest (1.2 seconds) |
| AI Super Resolution | Upscaling degraded video, restoring old photos | Invents new details, alters art style | Very Slow (45.0 seconds) |
Common Upscaling Mistakes
Even with the correct algorithm selected, post-processing errors can ruin your final asset. The most frequent mistake is saving the upscaled image as a JPEG file. JPEG compression relies on discrete cosine transform blocks, which introduces severe color banding and blurring around hard edges.
Another critical error is leaving auto-sharpening filters enabled in your export pipeline. Sharpening tools artificially increase local contrast, creating bright and dark halos around your carefully placed pixels. Always export your final upscaled assets as lossless PNG files at a 300 PPI print resolution to maintain absolute data fidelity.
Frequently Asked Questions
Why does my pixel art look blurry when I resize it?
Your pixel art looks blurry because your image editor is using a blending algorithm like bicubic or bilinear interpolation. These methods calculate average colors between adjacent pixels to create smooth transitions. Switch your software resampling method to nearest neighbor to force hard, unblended edges.
Is nearest neighbor better than AI upscaling for sprites?
Nearest neighbor is vastly superior for authentic pixel art because it preserves the exact original pixel placement. AI upscaling models are trained on high-resolution photography and will attempt to fix blocky pixels by adding smooth gradients and unintended details. Use AI only if you want to convert pixel art into a high-definition digital painting.
How do I print pixel art without losing the blocky look?
To print pixel art, first upscale the image using nearest neighbor to reach your target physical dimensions at a 300 PPI print resolution. Disable any printer driver settings that mention edge enhancement or photo smoothing. Print on matte paper to prevent ink bleed from softening your crisp pixel boundaries.
Conclusion and Next Steps
Nearest neighbor upscaling remains the undisputed standard for enlarging pixel art without compromising its foundational blocky aesthetic. By configuring your software to bypass blending algorithms and avoiding lossy compression formats, you guarantee that every pixel remains exactly where you placed it. Your immediate next step is to open your current sprite project, apply an 800% scale factor using the settings outlined above, and export a test PNG to verify edge crispness on your target display.
Related guides
How to Decrease Pixel Size of Image: Quick-Start Beginner Guide
Learn how to decrease pixel size of image files for web, print, and pixel art. Step-by-step workflows for Windows, Mac, and Photoshop.
How to Make Pixel Art in Procreate: Quick-Start Guide
Learn how to make pixel art in Procreate with this quick-start guide. Master canvas resolution, pixel-perfect brushes, and grid setups for crisp retro art.
What Is Pixel Art Exactly? A Quick-Start Guide for Beginners
Learn exactly what is pixel art, from grid fundamentals and resolution limits to essential tools like Aseprite. Your quick-start guide to placing pixels.